
My primary reason for using Cucumber in a recent automation initiative was to try and bridge a technology-business divide that existed in my workplace by giving the non-technical stakeholders a larger sense of involvement in testing with a (longer term) view to them actively contributing to future test specs by using the plain English approach that Cucumber does so well.
However, when I first started looking into Cucumber, there were a multitude of references out there but as I was also learning about Ruby, Watir and RSpec at the same time it became a little difficult to see the wood for the trees because they tended to talk about all of these things without being clear about where one thing stopped and another began.
What I’d like to do with this post is present a simple Cucumber 101 tutorial, letting cucumber guide us through the creation of a set of ‘scenarios’ (this is what Cucumber calls ‘tests’ or to be more precise, ‘checks’ – this is automated after all).
1. Cucumber Basics
Cucumber is a command line tool and when you run it, it looks for plain-language text files which typically contain one or more features, and within each feature, one or more scenarios to test. Within each scenario you have a number of steps that Cucumber works through. There is some syntax involved so that cucumber can understand what you’ve written and this is known as Gherkin. I’ll highlight this in the examples below.
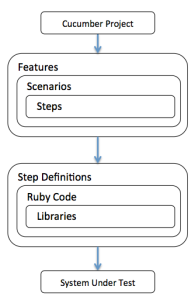
So if you were to see the directory structure required for a simple cucumber project, it would look something like this:

2. Installation Prerequisites
This tutorial assumes you have a copy of ruby, rubygems (or equivalent), watir-webdriver, rspec and of course cucumber installed on your target system.
3. Create a Scenario
Let’s create a new Cucumber project (a directory, called ‘Cuke’) and try running cucumber in this empty directory.
Wait, how do we run cucumber? Simple, type ‘cucumber’ (Note: We can specify arguments but in the absence of any cucumber assumes you want to run everything – more on that later).

So we have no features or scenarios. Cucumber is looking for a features directory. Let’s create one as it suggests. Once we’ve done that, let’s try running cucumber again.

So now we see that although cucumber found a features directory, there were no feature files and consequently no scenarios to run, hence the “0 scenarios” and “0 steps” references.
Let’s create a scenario in a feature file under the features directory, and let’s call the feature file karate.feature. Here’s the content:

For those of you unfamiliar with karate, Hironori Ohtsuka was the founder of the Wado-Ryu style of karate, and our scenario is checking for the presence of the founder’s surname in the Google results on a search for ‘Wado’.
You can see the Gherkin grammar highlighted in blue above – these must be used when writing feature files – the key Gherkin words include – Feature, Background, Scenario, Scenario Outline, Scenarios (or Examples), Given, When, Then, And (or But) and a couple of other symbols.
Now let’s run cucumber again with the new feature file in place:

So, cucumber is now picking up our new feature file. Great!
However, all of our scenario steps are as yet undefined.
4. Add Step Definitions
So, two things about the above output. Cucumber is telling us that our steps and scenario are as yet undefined (the yellow text) and that as yet, it doesn’t know which programming language we intend to use to implement our scenarios (the red text). Let’s take our lead from Cucumber and copy the suggested steps into a new step definition file, say step_karate.rb (The .rb suffix indicates a Ruby file). Like so…

and run cucumber again
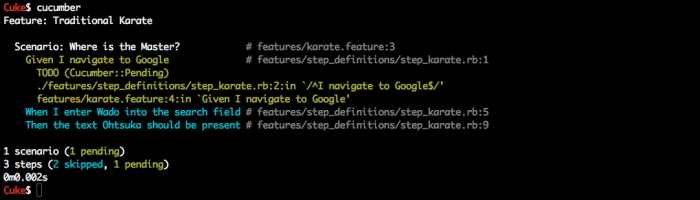
You may notice that the red text we saw in the ‘undefined’ error above has now gone. Why? We’ve put a Ruby (.rb) step definition file in place so Cucumber now knows we’re intending to use ruby to implement the scenario. So now we can map all the steps in our scenario to a step definition file, and cucumber helpfully provides the file and line number of each step it finds (this comes in useful later when you have large suites of scenarios) You’ll also notice that Cucumber has deemed the first step as ‘pending‘ (I.e. to be implemented) – this is due to the pending statement in the step definition. This acts as a placeholder so you can write some proper code for each step when you are ready. Cucumber takes a sequential approach to scenario steps and the subsequent steps are deemed ‘skipped‘
5. Implement Step Definitions
Let’s implement our first step definition now. We’ll take out the pending statement and put in some Ruby code that will start a web-browser.
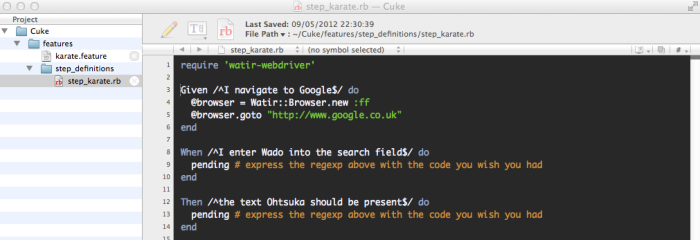
So for our first step “I navigate to Google” we’ve removed the pending statement and inserted two lines of Ruby/Watir-Webdriver, to start a browser (Firefox) and to navigate to Google.
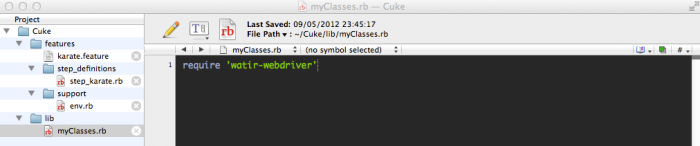
Note: I’ve included a Ruby ‘require’ statement in the step definition file. There are tidier ways of doing this since the key to maintainability of any cucumber suite lies with the step definition files. We’ll tidy this up a bit later
Let’s run cucumber again
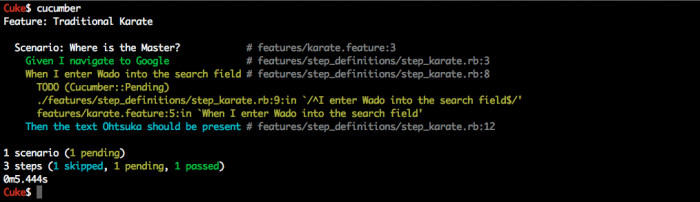
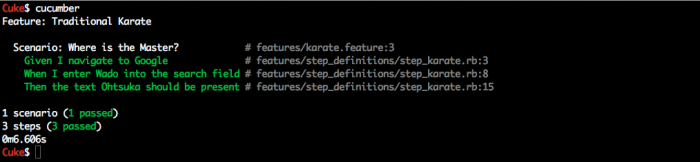
Now we see the first step passes (green), the second step is pending (yellow), and the third step is skipped (blue). Progress! You’ll also notice a browser opened in front of you (at Google) that hasn’t been closed – that’s because we didn’t close it in our code (yet). For now, kill the browser – we’ll tidy that up later. Let’s implement the remaining steps as shown below:

In the second step, we create variables for the Google search field and button, then enter the value ‘Wado’ into the search field and click on the button. In the third step we check that the results page has loaded and then perform another check to see if the text ‘Ohtsuka’ is present in the results page. If it’s there, the step will pass, and if it’s not the step will fail. Lastly, we close the browser instance.
6. Passed & Failed Scenarios
7. Tidy Up – Environment, Hooks, etc
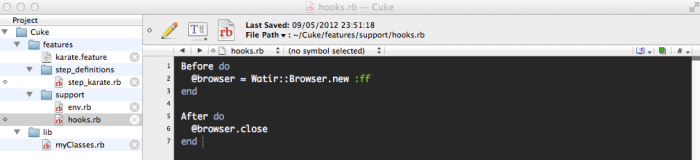
First of all, let’s get rid of that ‘require’ statement in the step definition file and put it somewhere more appropriate. We’ll create a new directory under features, called support, and under there we’ll create an environment file, env.rb and add two lines

8. HTML Formatters
You can also direct cucumber output to an HTML file using the default HTML formatters. by running the command:
cucumber -f html >output.html
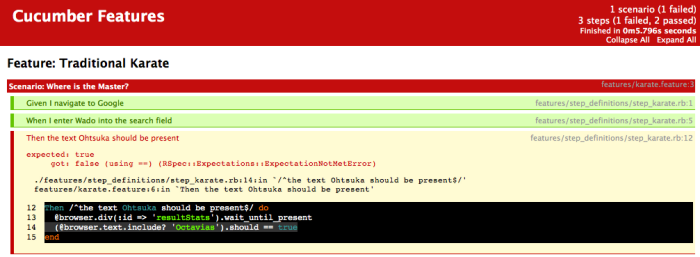
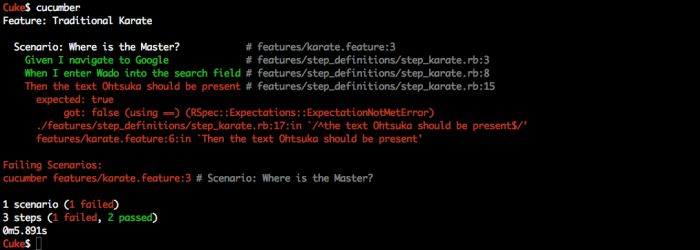
So as you can see the failed step is highlighted in red, as is the scenario, as is the cucumber header (if one scenario out of many fail then the header is coloured red accordingly).
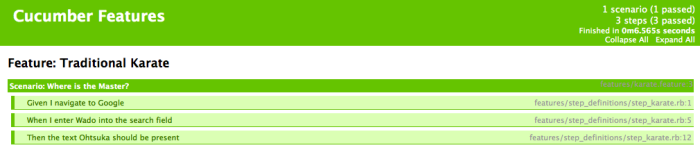
Now let’s change the string ‘Octavias’ back to ‘Ohtsuka’ and re-run
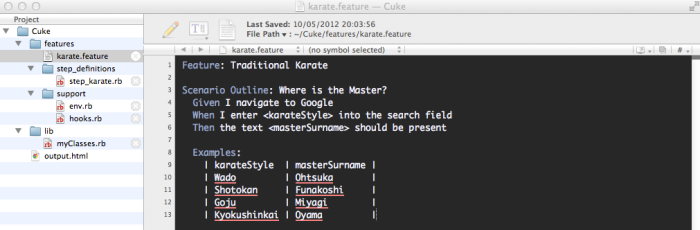
9. Multiple (Similar) Scenarios – Placeholders
- Wado-Ryu (Hironori Ohtsuka)
- Shotokan (Gichin Funakoshi)
- Goju-Ryu (Chojun Miyagi)
- Kyokushinkai (Masutatsu Oyama)

10. Tagging
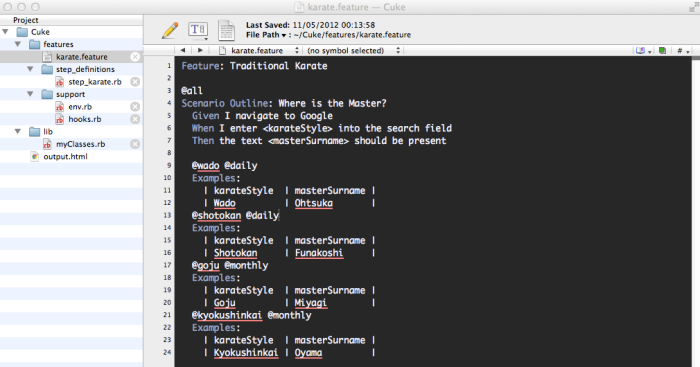
cucumber -t <tag>
- cucumber -t @all (This would run everything – all four scenarios)
- cucumber -t @daily (This would run the top two scenarios for Wado and Shotokan)
- cucumber -t @monthly (This would run the bottom two scenarios for Goju and Kyokushinkai)
- cucumber -t @wado (This would only run the top scenarios for Wado)

Thank you very much for sharing this. It is clear, concise and accurate, all the steps work perfectly. This has been a huge help in giving me a great starting point in using these tools. Thanks again, John.
Fantastic Tutorial. Thanks a lot for sharing this.
Reading thru this I am automating the triangle exercise from Eusebiu Blindu @ http://test1.testalways.com/cgi-bin/triangle/TestTriangle.html, so I get better at all these tools ;). One question I had in mind is – I observe that the web driver launches firefox before running each test. Is it possible to launch the browser for the first and then run all the tests and close it at the end?
Thanks
Sharath
Hi Sharath,
Thanks for the comments/feedback.
Yes, it’s absolutely possible to run all of the above tests with a single browser instance but in my experience it’s wise to use a fresh browser instance for each test.
One of the benefits of having a browser instance per test is that it encourages the re-use of the step definitions, helps minimise maintenance and arguably makes it easier to diagnose issues when they’re encountered (I.e. You know a problem falls within a specific test as opposed to trying to figure out whether it failed as a consequence of one of the many many earlier steps)
Good luck
Del.
Yes that’s a very valid point.
I think I am stuck at a point where cucumber keeps complaining about pending step defintion when I have a step definition defined for it. If you are free could you please help me with it?
Thanks
Sharath
Sure. PM me your email on twitter (@deefex) and I’ll try and help.
Greatest starting point document so far! Had to require rspec in the samples for “should” method.
For WADO the search may fail to find expected match so I updated them to include Karate (i.e. Wado Karate).
I see the browser open but unlike my standard watir-webdriver scripts I don’t see the navigation and actual form fills and submit results in the view. Maybe it just happens too fast to render completely.
I get this warning running cucumber with ruby 1.9.3
*** WARNING: You must use ANSICON 1.31 or higher (https://github.com/adoxa/ansic
on/) to get coloured output on Windows
Hasn’t anybody encountered this issue?
David – yes I do recall getting such an error, and I resolved it by following the procedure outlined here….
http://qastuffs.blogspot.co.uk/2011/02/how-to-install-ansicon-for-cucumber-to.html
The example offered here doesn’t quite work because the search on ‘Wado’ does not produce a page with the text ‘Ohtsuka’ on it, I have tried to modify the step_karate.rb file as follows, but since I am new to Cucumber Ruby I can’t quite get this right (see error reporting below). Here is my intention:
Given /^I navigate to Google$/ do
@browser.goto “http://www.google.com.au”
end
When /^I enter (\w+) into the search field$/ do | karate |
searchField = @browser.text_field(:name, ‘q’)
searchButton = @browser.button(:name, ‘btnG’)
searchField.set karate
searchButton.click
end
Then /^a link to Wikipedia should be there$/ do
link = @browser.link :text => ‘Wikipedia’
link.exists?
end
When /^I click on the Wikipedia link$/ do
link.click
end
Then /^the text (\w+) should be present$/ do | surname |
@browser.div(:id => ‘resultStats’).wait_until_present
(@browser.text.include? surname).should == true
end
————————-
This is what is reported when I run:
E:\Ruby193\cuke>cucumber
Feature: Traditional Karate
Scenario Outline: Where is the Master? # features\karate.feature:3
Given I navigate to Google # features/step_definitions
/step_karate.rb:2
When I enter into the search field # features/step_definitions
/step_karate.rb:6
Then a link to wikipedia should be there # features\karate.feature:6
When I click on the Wikipedia link # features/step_definitions
/step_karate.rb:18
Then the text should be present # features\karate.feature:8
Examples:
| karateStyle | fullStylename |
| Wado | Ohtsuka |
1 scenario (1 undefined)
5 steps (1 skipped, 2 undefined, 2 passed)
0m7.664s
You can implement step definitions for undefined steps with these snippets:
Then(/^a link to wikipedia should be there$/) do
pending # express the regexp above with the code you wish you had
end
Then(/^the text should be present$/) do
pending # express the regexp above with the code you wish you had
end
————————-
I was hoping someone could perhaps explain how to get this modification to work.
Update the input value kartateStyle ‘Wado’ to ‘Wado Karate’. That corrects the search results. Its an old script browser rankings change over time which is why its no longer in the top ten return results.
Sorry that doesn’t actually help – the search in my browser still fails.
I have rejigged the scenario outline to try and make the result more resilient and not dependent on browser rankings.
I am keen to get my Ruby code to work….
OK, I did a little tinkering and got something working.
I used slightly modified scenario text so there wasn’t multiple when/thens but the gist is the same. Note – I had to change the angle brackets for the parameters in the feature file in this comment as wordpress kept removing them.
feature file contents:
Feature:Traditional Karate
Scenario Outline:Where is the Master?
Given I navigate to Google and search using the term [karateStyle]
And the results include a Wikipedia link
When I click on the Wikipedia link and view the page
Then the [masterForename] should be present
Examples:
| karateStyle | masterForename |
| Wado | Hironori |
and the ruby step definition file contains:
require ‘watir-webdriver’
Given(/^I navigate to Google and search using the term (\w+)$/) do | karate |
@browser = Watir::Browser.new :ff
@browser.goto “http://www.google.com.au”
searchField = @browser.text_field(:name, ‘q’)
searchButton = @browser.button(:name, ‘btnG’)
searchField.set karate
searchButton.click
end
Given(/^the results include a Wikipedia link$/) do
@browser.div(:id => ‘resultStats’).wait_until_present
(@browser.text.include? ‘Wikipedia’).should == true
end
When(/^I click on the Wikipedia link and view the page$/) do
wikiLink = @browser.a(:text,/.*Wikipedia.*/)
@browser.goto wikiLink.href
end
Then(/^the (\w+) should be present$/) do | forename |
@browser.div(:id => ‘mw-page-base’).wait_until_present
(@browser.text.include? forename).should == true
@browser.close
end
I had to change the surname to forename as there are some peculiarities with diacritics in the wiki version of the surname which I could probably get working with some more time, but it was easier to use the forename to illustrate the example.
Enjoy.
fantastic starting point! This is what you need, the books are fine but this is just a fantastic starting point and I would advise people learning Ruby and Cucumber to start here.
Excellent work. It really helped me to get started with cucumber.Thanks